Osprey provide you with a number of control templates that you can use to quickly create and curate your own library of controls for use by your organisation, in addition to the ability to creating your own controls from scratch.
Managing the Controls Library
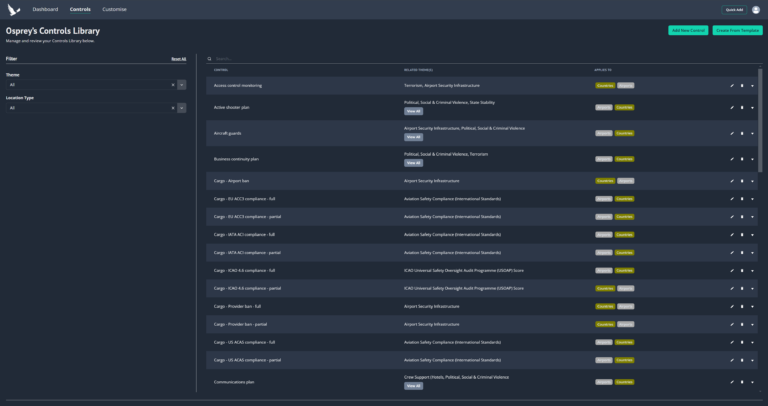
To manage your organisations controls library this can be accessed by clicking the ‘Controls’ navigation menu item in the navigation bar at the top of the screen.
This will navigate you to the ‘Controls Library’ page, if at any time you wish to return to the dashboard you can do so by selecting the ‘Dashboard’ navigation bar link.
‘Manage Controls Library’ page consists of:
• A single page view of all Controls available for use by all users of your account.
• The ability to create controls using the available templates provided by Osprey.
• The ability to create controls from scratch.
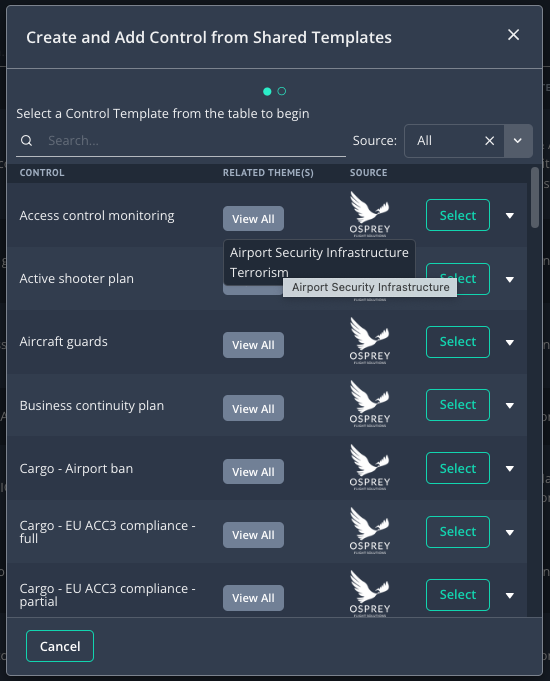
To add a control to your organisations controls library by using a template simply click the ‘Create from Template’ button.
A form will display overlaying the page, this contains a list of all available control templates supplied by Osprey
The list can be searched or filtered using the options at the top of the form. To view the description for the control template, click the expand icon within the table row.
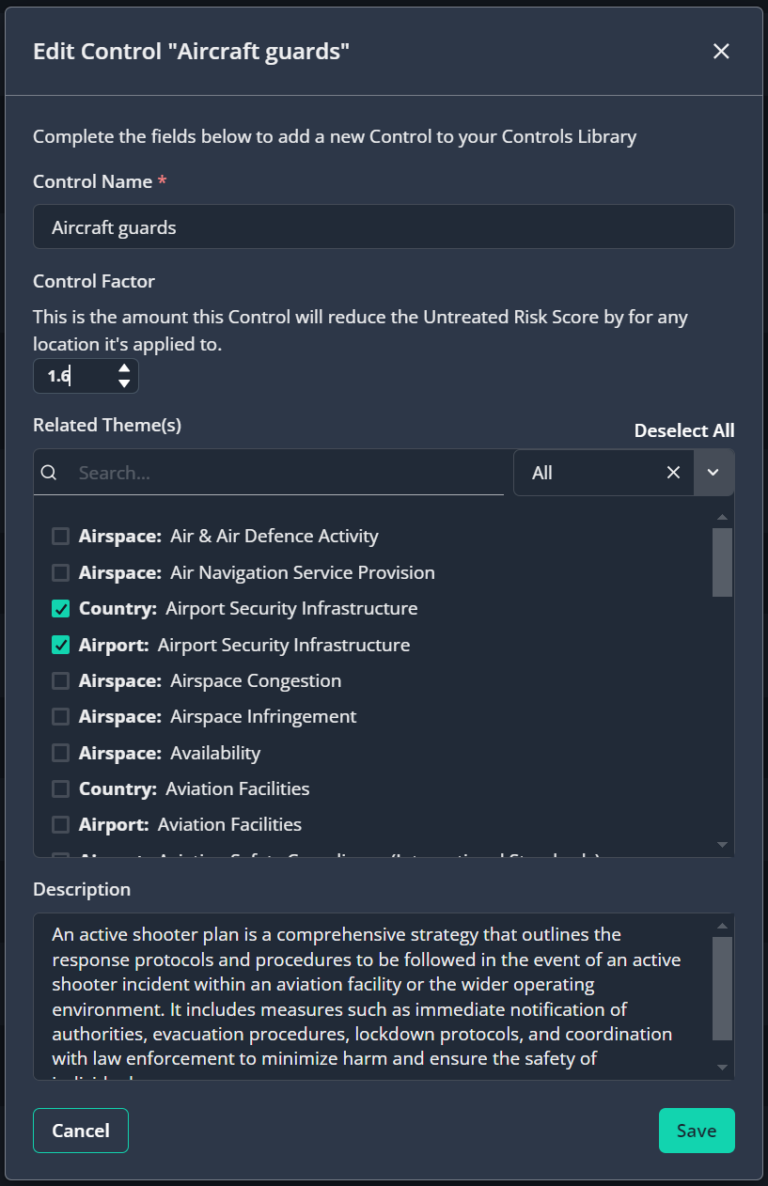
To select a template to use, click the ‘Select’ button in the table row, the form will update to allow you to edit the control details before adding it to your library.
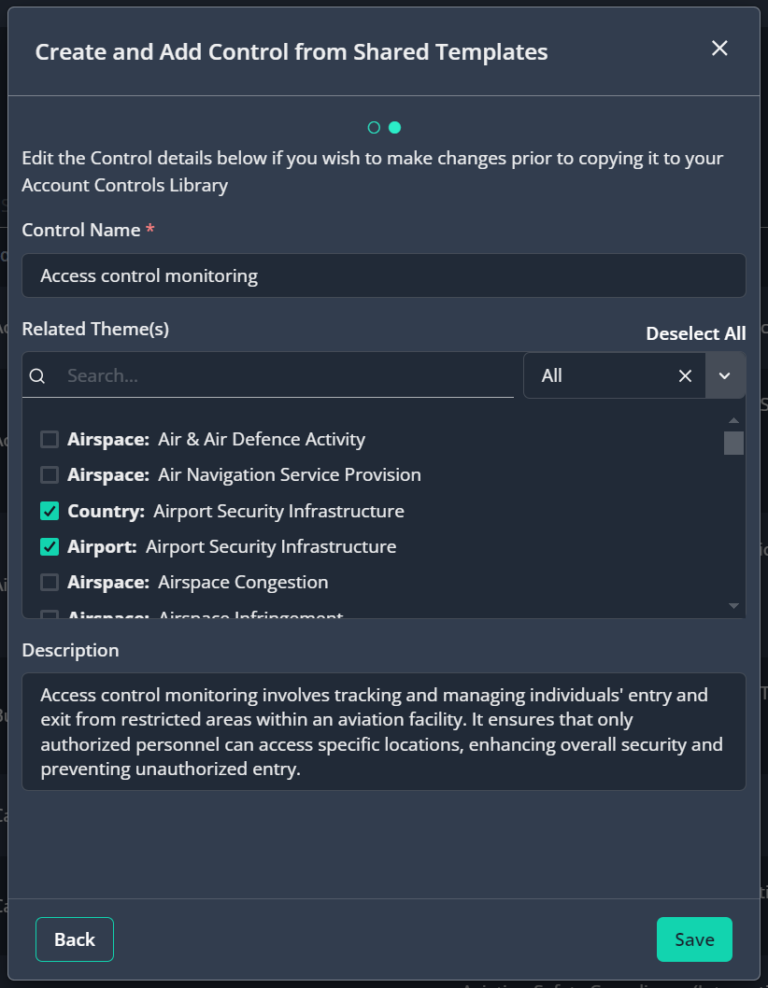
You can choose to change the name, description and be select which themes the control applies to in this view. Once you are happy with the control details clicking the ‘Save’ button will add it to your Controls Library.
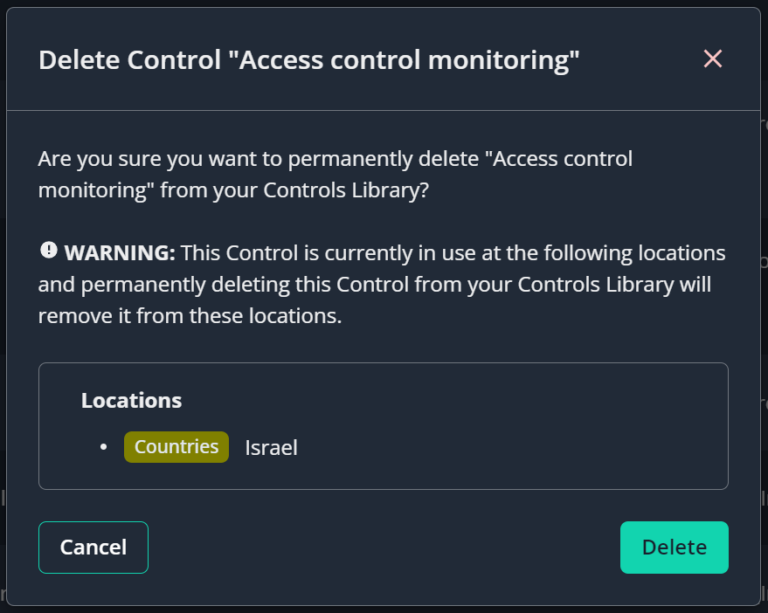
If you wish to delete a control from your Controls Library, you can do so by clicking the ‘delete’ icon on the row for the control in the Controls Library table.
delete icon
Please note:When a control is removed from your organisations controls library, if it has been applied to location in the themes & controls tab of a location overview in the dashboard, then it will no longer be applied to those locations following removal – you may need to review these locations to ensure risk management measures are appropriate following the removal of the control.
A warning message will appear when a control is removed from your organisations library of controls to make you aware of the above, if the control is applied to any locations, then these will be listed to make you aware of which locations may require a review.
You can make changes to controls in your Controls Library by clicking the ‘edit’ icon on the table row for the control you wish to edit, this will display a form overlaying the page where you can make changes and save them.
When curating your organisations controls library, if a control does not already exist as a template, you have the option to create your own custom control.
To do so click the ‘Add new control’ button
Download Report
The ‘Add new control’ form will display in a modal overlaying the ‘Controls Library’ page.
‘Control Rating Automation’ is a feature available in Risk Manager that reduces manual overheads by automatically calculating the ‘Total Control Factor’ for a location based on the Controls that have been applied to it.
If you do not currently have this feature enabled on your account, please speak to your Client Success Manager who can discuss this with you in more detail and enable it on your account.
With ‘Control Rating Automation’ enabled, each control in your Controls Library will need a ‘default Control Factor’ value setting for it. This can be done via the Controls Management page by selecting the ‘Controls’ menu option in the navigation bar.
By default, the ‘Control Factor’ value for each of the controls in your Controls Library will be set to 0.
To edit this value, select the ‘Edit’ icon in the table row you wish to edit, a modal will display where there will be an option present for you to set the Control Factor for the selected Control.
We refer to this as the ‘default Control Factor’ as this is the value that will be present when selecting which Control to apply to a location.
This value should be considered as a ‘guideline’ or ‘suggested’ Control Factor for a Control – so when setting this within the Controls Library consider using a value that you feel will apply to most locations if left unadjusted.
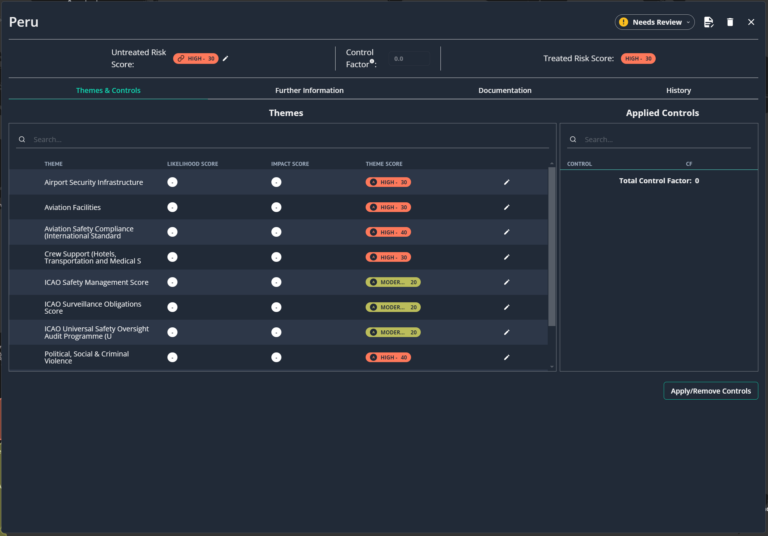
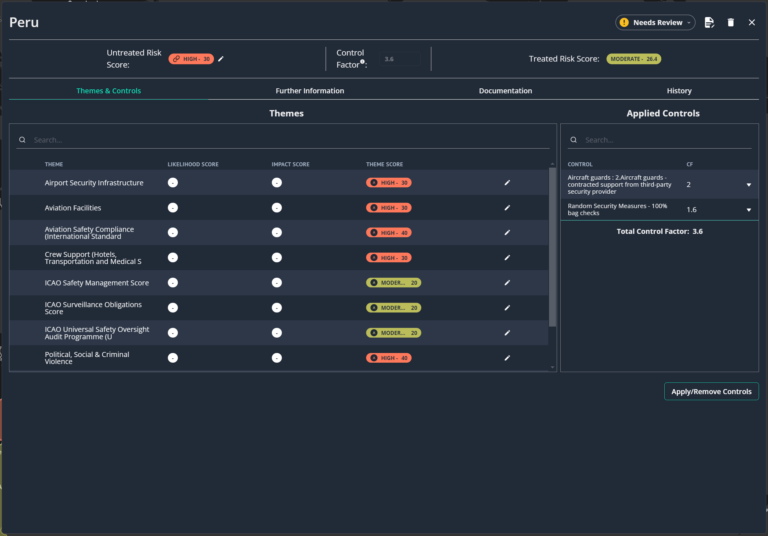
With the Control Rating Automation feature enabled the location overview panel will look slightly different:
• The Control Factor field at the top of the location overview will be un-editable.
• Within the ‘Applied Controls’ section the ‘Total Control Factor’ will display to show you how the applied controls total up.
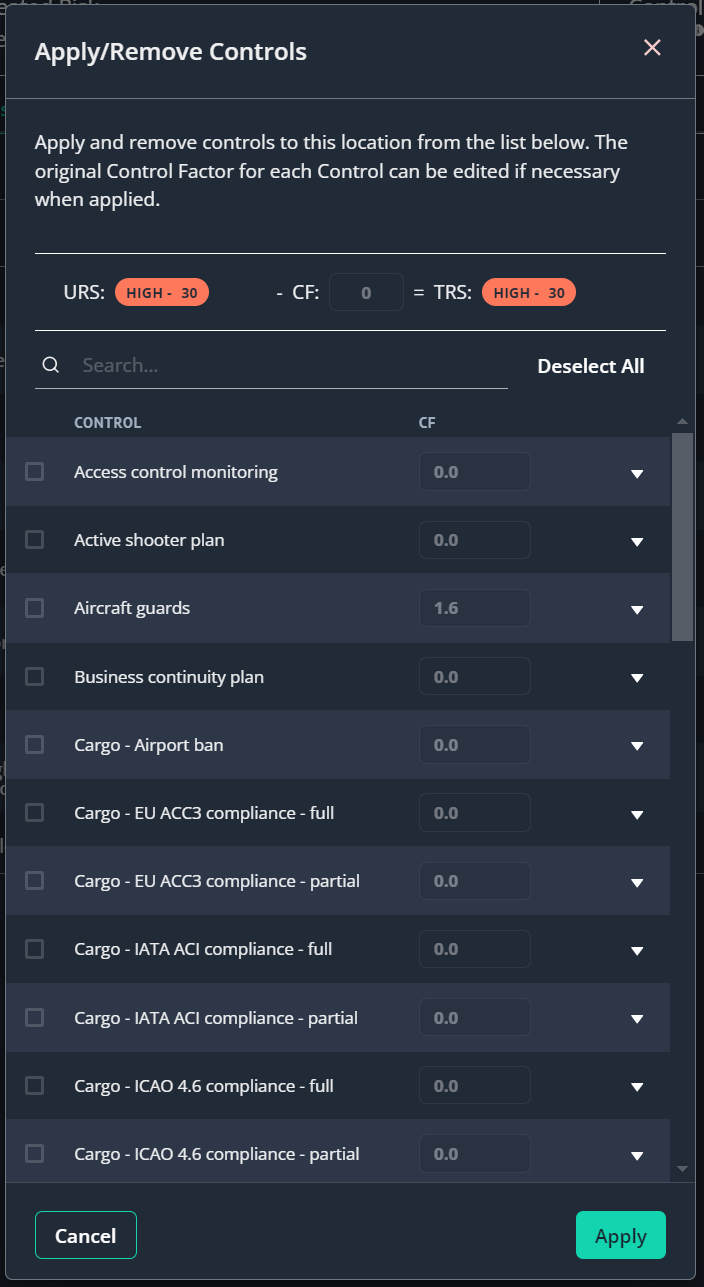
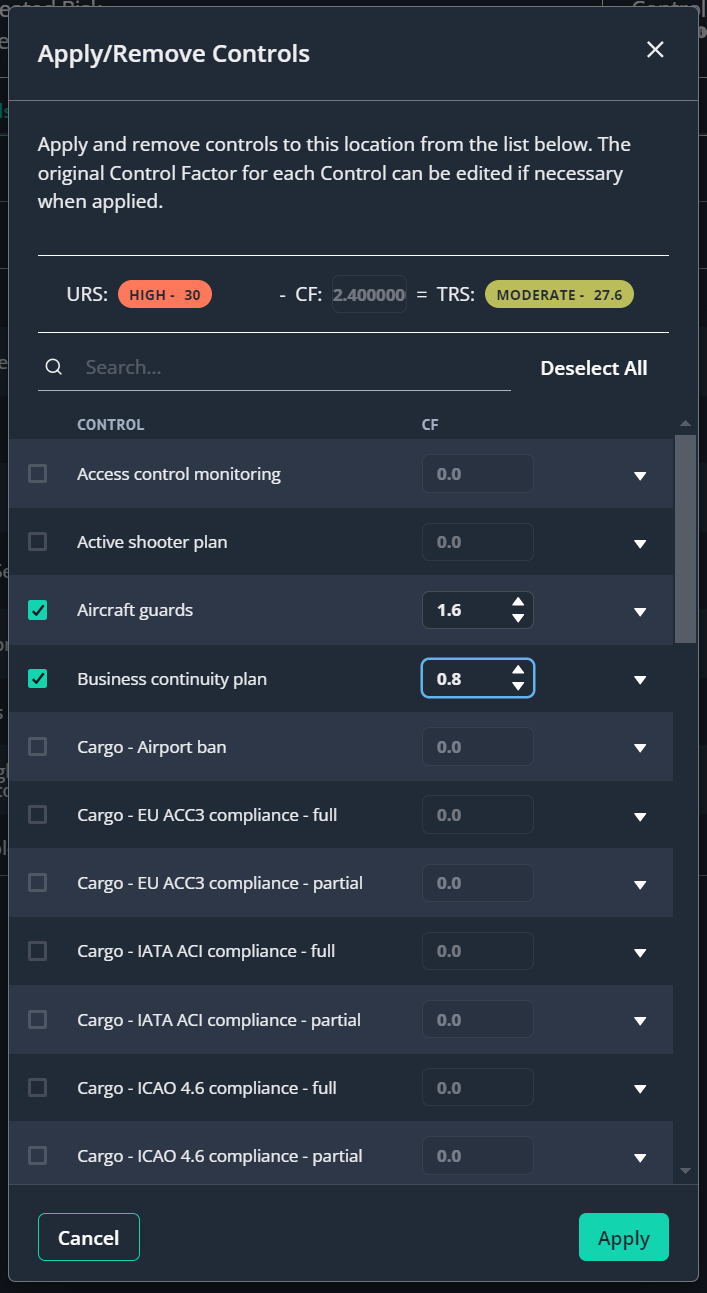
When applying/removing controls to/from a location, your default Control Factor values that are set in the Controls page will be displayed. When a checkbox is selected this will become editable, you have the option to leave this value as it is or update it if you feel it has a different weighting from the default value depending on which location it is being applied to.
As you enable/disable the checkboxes, to apply/remove controls, the calculation at the top of the ‘apply/remove controls’ modal will update to allow you to see how your changes are automatically calculated and affect the Treated Risk Score.
If you feel a Control has a greater weighting on mitigating the risks for the location, you can manually adjust the Control Factor value by typing in the CF field or adjusting the arrows.
When the apply button is clicked, the ‘total Control Factor’ will be populated, and the Treated Risk Score calculated automatically.